Friday, October 28, 2022

Halloween Cake Pops: Spice Cake with Cream Cheese Frosting #Halloween #Cake


I have always wanted to make Cake Pops. For as long as I have been baking and making candy, I oddly have not attempted cake pops. I say attempted because these were a bit harder to do than I had expected! A big round of applause from me for the bakers that have perfected these. 

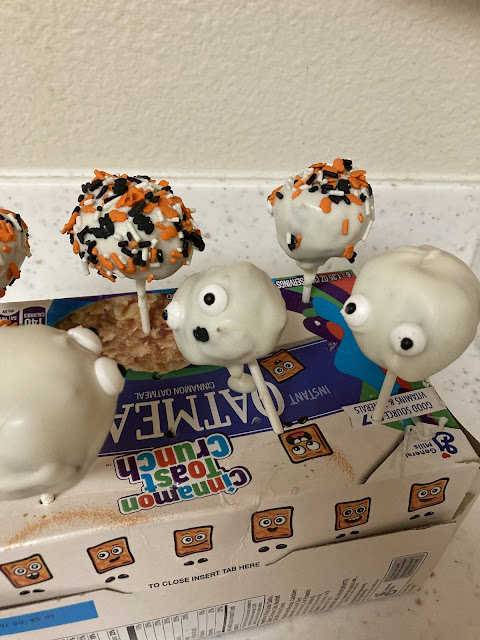
I started out with the idea of making some ghost cake pops for my family and coworkers. (My photo above, we call him the Forkey Cake Pop) My coworkers have been my taste testers for years and always give me good honest feedback. I thought mine turned out too moist, but they all agreed that the cake pops were delicious and better a moist cake than the cake pops being dry. 


I started with a basic box cake mix. I selected Betty Crocker Spice Cake Mix; I bought the super moist one that had pudding in the mix. Now I think it might be why the consistency was off. Next time I will buy a different one for cake pops. It was a delicious cake and the house smelled amazing like pumpkin pie. Follow directions on your cake mix. Mine required eggs, oil and water to be added to the box cake mix. Allow the cake to cool for 30 min to an hour after baking.


When cake is cooled you can begin the process of crumbling the cake. I started with a small container and quickly realized I needed a bigger container. (I yelled "We're gonna need a bigger boat!" my husband rolled his eyes at my ever-present movie references to all life situations LOL) Let me know if you know the movie.


After crumbling the cake into tiny pieces, I added 3 heaping dollops of cream cheese frosting to the cake crumbles. Stir in the frosting to make an even mixture of cake and frosting with a wet sand like consistency. Roll cake into 1 inch size balls. Set in fridge for 4 hours or freezer for 30 minutes. 


I opted to freeze mine for 30 min to get the Cake Pops set for dipping. I prefer to use melting wafers when dipping items for treats since it is easier to use than other chocolates. I purchased a cake pop kit from Amazon for the sticks, bags and twist ties. I also bought Candy eyeballs and Halloween sprinkles at Walmart.


I did say I like to use melting wafers since it is easier BUT that is not to say you still can't ruin them! HA! I accidently burnt the chocolate in the bowl on the right and wanted to share how it can be burned in the difference of a few seconds in the microwave. Follow the instructions for melting on the bag you purchase. Mine did not look melted but if I had stirred them while in wafer form after the set time for melting, I would have realized they were ready. Trial and error are expected when learning to make something new.


I poured out my toppings of eyeballs and Halloween sprinkles onto a plate to be ready to place on the cake pops once dipped in chocolate.


Dip the tip of your cake pop stick into your melted chocolate and insert it about halfway into the cake ball. Dip the cake ball into the chocolate. Remove and gently tap on the side of the bowl to allow excess coating to drip off. I did have some cake balls fall off into the chocolate, but I spooned them out and put them back on the stick.


So, I am going to definitely point out that I forgot a crucial item in my Cake Pop adventure. A cake pop stand to allow the chocolate coating to dry! I improvised with an oatmeal box that I poked holes in with a pencil. If using this method, I suggest removing the oatmeal packets from the box before poking holes with a pencil. How I know this, well again trial and error. HA!!


My first handsome Halloween Cake Pop made with Spice Cake and Cream Cheese frosting. Delicious!


None of my cake pops look the same but I think it made them each more special.


Share:

Monday, November 26, 2018

Holiday Favorite Recipes: M&M's® Hot Chocolate Christmas Cake Recipe #repost #throwback #recipe

***This is a REPOST from November 2015 #throwback 
This shop has been compensated by Collective Bias, Inc. and its advertiser. All opinions are mine alone. #BakeInTheFun #CollectiveBias


The holiday season is here and I'm very excited that I've already started my holiday baking. It's my favorite time of the year to share desserts and treats with family and friends. I have the most wonderful memories of my mother being busy in the kitchen, baking delicious pies, cakes, and cookies.

My mom would save her change in a jar all year round so that she would be sure to have enough money when Christmas came so that she could buy the ingredients she needed for her baking and candy making.

I like to think about her when I'm baking for my children and grandchildren, and they seem to love my baking, just like I loved hers.

I've mentioned before how much I enjoy the seasonal M&M's® I always find at Walmart, and sure enough, the other day I found M&M's® Hot Chocolate flavor. So, so good!! And I also bought the Pillsbury™ Funfetti® Holiday Cake Mix and Pillsbury™ Funfetti® Holiday Vanilla Flavored Frosting to make a yummy cake for my family.


It's so easy to whip up a cake with this cake mix and frosting, and I simply added hot chocolate mix and chopped M&M's® Hot Chocolate candies to the cake batter for a great hot chocolate flavor.

I also bought some M&M's® Holiday Peanut because peanut is my absolute favorite kind of M&M's®, though I have to say that all the other flavors are a close second.


When my four year old granddaughter saw this cake she said it was beautiful, and that is one of the reasons I bake, for love, for family.

I want her to remember her and I baking together, which we frequently do, and remember how much fun we had in the kitchen.


Simply add chopped candies and hot chocolate mix to the batter to give it that great hot chocolate flavor. I always make sure to use parchment paper and vegetable oil so that my cake doesn't stick to the pan, it works every time.

Put together and frost both layers of the cake, then the real fun begins! Decorate your cake with the sprinkles that come with the Pillsbury™ Funfetti® Holiday Vanilla Flavored Frosting, and the M&M's® Hot Chocolate flavored candies.

This is really such an easy way to make a fun and festive cake that you can enjoy at home, or bring to a holiday gathering.

Recipe For M&M's® Hot Chocolate Christmas Cake

Ingredients:

1 box of Pillsbury™ Funfetti® Holiday Cake Mix
1 cup water
1/2 cup vegetable oil
3 eggs
1/4 cup hot chocolate powder
3/4 cup M&M's® Hot Chocolate flavored candies, roughly chopped

For frosting cake:

1 container Pillsbury™ Funfetti® Holiday Vanilla Flavored Frosting
additional M&M's®

Directions:

Preheat oven to 350 degrees. Oil and place parchment papers (if using) into 2 8-inch round cake pans.
Combine cake mix, water, oil, and eggs in a large bowl. Beat with a hand mixer at medium speed until well combined, about 2 minutes. Add in chopped candies and hot chocolate mix, stirring well.
Divide evenly into the prepared pans. Bake 20-24 minutes until done, and a toothpick inserted in the center comes out clean.
Let cool 10 minutes, then remove cakes from pans, put on a wire rack and let cool completely before assembling and frosting.
Decorate with sprinkles and candies.


My family and I drink a lot of milk, we can go through quite a few gallons in a week. I always appreciate the low prices on Great Value Milk at Walmart.


Having a glass of milk with dinner and dessert is something that many people take for granted. But many families with children aren't that lucky, and go without milk and it's essential nutrients because it's not typically donated to food banks, even though it is in high demand.

More than 46.5 million Americans – including one in every six children – rely on Feeding America food banks each year. And one of the most requested food items is milk. But sadly, food banks are only able to provide the equivalent of less than one gallon of milk per person per year.

But we can help out by making a small donation at pourmilklove.com. The Great American Milk Drive will deliver a gallon of milk – and all of the essential nutrients, including protein, that it provides – to a family in need in YOUR local community.

When you purchase two bags of M&M's® at Walmart ( 9.4 oz. bags or larger) up to a gallon of milk will be donated to the drive. What a great way to help get milk to children who need it. And you can also make a donation to the Great American Milk Drive here.


You can find all these products, and additional flavors of M&M's®, at your local Walmart. Check out the baking aisle for all kinds of great dessert and baking ideas.

Use this coupon to save $1.00 on any two (2) bags of M&M's® Chocolate Candies 8 oz. or larger.


Be sure to check out more delicious holiday baking recipes here. And tell me what your favorite holiday recipe, I'd really love to know.


Patricia
Share:

Sunday, August 28, 2016

Fresh Peach Cake Recipe From Back In The Day Bakery Made With Love Cookbook


It sort of feels like I should call this cake the "end of summer fun cake". Tomorrow my grandchildren will start a brand new school, in a brand new town, in this brand new to us, state of Nevada.

I think my daughter and son-in-law have prepped them well for this new adventure, emotionally, and with the must have new clothes, backpacks, and shoes. I think, and hope, and pray that the new school will be a great place for them.

When you live with your grandchildren like I do, there isn't really the emotional separation from their lives like other grandparents have. And so I can get caught up in what is happening to them, and just like a parent, I want everything to always go smoothly for them, and life just isn't like that as we all know.

So all I can do is offer them love and support, and cake. Trust me, cake helps. I made this delicious cake for dessert for them last night and they loved it. Who doesn't love yummy cake with peaches and whipped cream, right?

This is actually another cake recipe from the Back In Day Bakery Made With Love Cookbook, by Cheryl and Griffith Day. I absolutely love their southern style way of life and baking. It's become one of my favorite cookbooks.

I found delicious peaches on sale at the grocery store and thought this cake would be a great end of summer dessert for us, and it was. So good!!


Recipe for Fresh Peach Cake

Ingredients:

1 cup unbleached all-purpose flour
1 teaspoon baking powder
10 large peaches, peeled, pitted, and cut in half
1 tablespoon fresh lemon juice
8 tablespoons (1 stick) unsalted butter, at room temperature
1/2 cup plus 3 tablespoons granulated sugar
1/2 cup packed light brown sugar
2 large eggs, at room temperature
1 teaspoon pure vanilla extract
1/2 teaspoon ground cinnamon

Directions:

Position a rack in the middle of the oven and preheat the oven to 350 degrees. Butter an 8-inch square (or round, like I used) cake pan, then line the bottom with parchment paper and butter it as well. Lightly dust the pan with flour, tapping the pan on the counter to shake out the excess.

Stir together the flour and baking powder. Set aside.

In a large bowl, toss the peaches with the lemon juice. Set aside.

In the bowl of a stand mixer fitted with the paddle attachment (or in a large mixing bowl, using a hand held mixer), cream the butter, 1/2 cup of the granulated sugar, and the brown sugar on medium-high until very light and fluffy, 3 to 5 minutes.

With the mixer on low speed, gradually add the dry ingredients, mixing just until incorporated.

Add the eggs one at a time, mixing well after each addition and scraping down the sides of the bowl with a rubber spatula as necessary. Add the vanilla and mix until just incorporated.

Remove the bowl from the mixer and use the rubber spatula to incorporate any ingredients hiding at the bottom of the bowl, making sure the batter is completely mixed. Scrape the batter into the prepared pan and gently smooth the top with the spatula. Tap the pan firmly on the counter to remove any air bubbles from the batter.

Arrange the peaches on top of the batter, cut side down. Stir together the remaining 3 tablespoons granulated sugar and the cinnamon and sprinkle on top of peaches.

Bake for about 1 hour, or until a cake tester inserted in the center of the cake comes out clean. Cool for 15 minutes, then remove from the pan, peel off the parchment, and transfer to a wire rack to cool.


- Post by Patricia


Share:

Monday, August 8, 2016

Strawberry Buttermilk Cake Recipe From Back In The Day Bakery Made With Love Cookbook


I'm rarely dazzled by celebrities, or movie stars, but I am a little star-struck when it comes to my favorite cooks and cookbook authors. I have a major couples crush on Cheryl and Griffith Day, who own the Back In The Day Bakery in Savannah, Georgia.

I just love their easygoing Southern style, and the way they produce such gorgeous cookbooks that make me want to bake every single recipe.

Their beloved bakery is a neighborhood hangout for locals, where you can have a cup of coffee or tea and a delicious made from scratch treat. If I ever make it to Georgia, their bakery is on the top of my list to visit.


But back to this fabulous recipe for Strawberry Buttermilk Cake. I love desserts made with fruit, and I love the wonderful depth of flavor that baking with buttermilk provides. There are both in this recipe, and I just know it's going to become one of my family's favorite cake desserts.

The recipe calls for baking it in a deep dish pie plate but I baked it in a 9-inch round cake pan. I wanted to be able to put it on a cake stand, so this worked out well. If you want to do this, just butter the pan and use a round piece of parchment paper in the pan.

The recipe is from the Day's second book, Made With Love. It's packed with more than 100 recipes and projects that is made for cooks of all levels. I can't wait to get into the kitchen and try some more of their recipes, especially the cakes, pies, and cookies.


Recipe for Strawberry Buttermilk Cake

Ingredients:

1 1/2 cups unbleached all-purpose flour
1 1/2 teaspoons baking powder
1/2 teaspoon fine sea salt
6 tablespoons unsalted butter, at room temperature
1 cup granulated sugar
1 large egg, at room temperature
1/2 cup buttermilk
1 teaspoon pure vanilla extract
1 pound strawberries, hulled and halved

Confectioners' sugar for dusting

Directions:

Position a rack in the middle of the oven and preheat the oven to 350 degrees. Lightly butter a 9-inch deep-dish pie pan.

Sift together the flour, baking powder, and salt. Set aside.

In the bowl of a stand mixer fitted with a paddle attachment (or in a large mixing bowl, using a handheld mixer) cream the butter and sugar together on medium high speed for 3-5 minutes, until light and fluffy. Add the eggs, buttermilk, and vanilla and mix until blended, about 1 minute.

With the mixer on low speed, gradually add the flour mixture, mixing until just combined.

Remove the bowl from the mixer and, using a rubber spatula, incorporate any ingredients hiding at the bottom of the bowl, making sure the batter is completely mixed. Scrape the batter into the prepared pie plate and gently smooth the top with a spatula. Tap the pan firmly on the counter to remove any air bubbles from the batter. Arrange the strawberries in a concentric rings on top of the batter, cut side down.

Bake the cake for 10 minutes, then reduce the temperature to 325 degrees and bake for 50-60 minutes, until a cake tester inserted in the center comes out clean. Let the cake cool in the pan on a wire rack.

Before serving, dust the top of the cake with confectioners' sugar. The cake can be stored in the refrigerator for up to 2 days.

Serves 8.


-Post by Patricia   
Share:

Wednesday, July 6, 2016

Birthday Celebration and Recipe For Birthday Cake


It was my birthday at the end of June, and I had a great day celebrating with my family. We had a delicious barbeque dinner out on the deck, and then enjoyed this three-layer yellow cake with classic buttercream frosting.

My granddaughter Ashley and I made my birthday cake. Maybe it's odd to make your own cake, but since I love baking, it was the perfect opportunity to try out a recipe I've been wanting to make for awhile now.

The recipe comes from the cookbook Homemade Decadence, by blogger Joy The Baker. It's perfect for a birthday cake, and I've never baked a cake that got more compliments.

It's just so moist and delicious, and has a tender, buttery flavor. And the buttercream frosting, which I tinted pink, is pure heaven.


It's hard to get a picture with these little monkeys where everyone is smiling, and looking at the camera at the same time. They were being silly, and I loved it, of course.

One of the things I am more and more grateful for as each birthday passes is my children and grandchildren. I love being a mom and grandmother, and my family is at the center of my world.


I almost didn't put the sprinkles on the cake but it was a unanimous vote by the grandkids that they go on, and that they put them on themselves!!

They did a great job, and I love how the cake turned out. Since it was three layers, the cake was big enough that we had some leftover, and I ate a big piece for breakfast the next morning. It's my birthday so I had fun indulging myself, yum!!

This cake really is the perfect birthday cake, and whoever is lucky enough to have one baked for them will be extremely happy.


Recipe for Basic Three-Layer Yellow Cake from Homemade Decadence

Ingredients:

For cake:

4 cups cake flour
2 teaspoons baking powder
1 1/2 teaspoons baking soda
1 teaspoon salt
1 cup (2 sticks) unsalted butter, at room temperature
2 cups sugar
1 tablespoon pure vanilla extract
4 large eggs, at room temperature
2 cups buttermilk

For buttercream frosting:

2 cups (4 sticks) unsalted butter, at room temperature
5 to 6 cups confectioners' sugar, sifted
1/4 teaspoon salt
3 teaspoon pure vanilla extract
About 1/4 cup heavy cream

Directions:

1. Put oven racks in the center and upper third of the oven and preheat the oven to 350 degrees. Grease and flour three 9-inch round baking pans.

2. In a medium bowl, whisk together the flour, baking powder, baking soda, and salt.

3. In the bowl of an electric mixer fitted with the paddle attachment, beat the butter and sugar on medium speed until light and fluffy, 3 to 4 minutes. Add the eggs, one at a time, beating for 1 minute between each addition.
Beat in the vanilla extract. Reduce the mixer speed to low, add half of the flour mixture, and beat well. Add the buttermilk in a slow stream and beat well. Add the remaining flour mixture and beat until just combined. Finish stirring with a spatula. Divide the batter among the 3 prepared pans.

4. Bake until golden brown on top and a wooden pick inserted in the center comes out clean, 20 to 25 minutes. Let cool in the pans for 20 minutes before inverting onto wire racks to cool completely before frosting.

5. If you're not using right away, double-wrap the cake layers in plastic wrap, and freeze for up to 7 days. When ready to frost, remove from the freezer, unwrap, and frost frozen.


To make the frosting, in the bowl of an electric mixer fitted with the paddle attachment, beat the butter on medium speed until soft, about 1 minute. Add 2 cups of the confectioners' sugar, the salt, and the vanilla. Beat on low speed until the sugar is well incorporated. Add another 2 cups sugar and the cream. Add remaining 2 cups of sugar as needed to thicken the frosting. Beat on medium speed until the frosting is smooth and fluffy, about 4 minutes.

Frost and put together layers of cake, sprinkle with colored sprinkles if desired.

Makes one 3-layer 9-inch cake.


-Post written by Patricia 
Share:

Wednesday, April 27, 2016

Delicious Chocolate Cake


The more I bake, the easier it gets when I have a pantry filled with all the ingredients that I need. There's nothing more frustrating than to get inspired about baking something yummy and then discover you don't have all the things you need.

So I've been keeping an eye on what I have in the pantry and jotting down something when it starts getting low as a reminder to myself to pick up whatever it is the next time I'm at the grocery store. And if you knew me, you'd be highly impressed because I'm sometimes the type of person who is out of butter just when it's time to put some on your toast.

Yesterday I decided it was a great day for making chocolate cake, what day isn't great for chocolate cake, right?

I'm discovering that whenever I use sour cream as an ingredient in a cake, it's usually extra moist. This recipe uses sour cream, and I'm convinced that's one of the reasons why it tastes so good. And it's a Martha Stewart recipe and I can pretty much count on her recipes turning out well.


This cake is pretty easy to make, and has a rich chocolaty flavor that you'll love. You can make it in a Bundt pan or a tube pan. I actually have a tube pan that the cake just lifts out and that's what I used for this cake.

It serves about eight good sized portions. We ate it for dessert and had some left over and it was equally moist and yummy the next day.


Recipe for Delicious Chocolate Cake

Ingredients:

  • 8 ounces (2 sticks) unsalted butter, plus more for pan
  • 2 1/4 cups all-purpose flour
  • 3/4 cup unsweetened cocoa powder
  • 1 teaspoon baking soda
  • 1 teaspoon salt
  • 1/2 cup milk
  • 1/2 cup sour cream (4 ounces)
  • 1 1/2 cups sugar
  • 4 large eggs
  •  
    For the glaze:
     
    3 ounces bittersweet chocolate, chopped
  • 1/2 cup heavy cream
  • 2 tablespoons unsalted butter

  • Directions:

    Preheat oven to 350 degrees. Spray a Bundt or tube with non-stick baking spray.
    In a large bowl, whisk together flour, cocoa, baking soda, and salt. Mix together milk and sour cream in a measuring cup.
    With an electric mixer on medium-high speed, beat butter and sugar until pale and fluffy, 3 to 5 minutes. Add eggs, 1 at a time, beating well after each addition; add vanilla. Reduce speed to low; add flour mixture in 2 batches, alternating with the milk mixture and beginning and ending with the flour; beat until just combined. until just combined. Transfer batter to prepared pan; smooth top with an offset spatula. Bake until a cake tester comes out clean, about 55 minutes. Transfer pan to a wire rack to cool completely.

    Make the glaze: Place chocolate in a heatproof bowl. Bring cream to a simmer in a small saucepan; pour over chocolate. Let stand 2 minutes. Add butter, and mix until smooth. Let stand, stirring occasionally, until slightly thickened. Pour glaze over cake.


    Patricia
    Share:

    Monday, March 28, 2016

    Plum Butter Cake Recipe


    Fruit desserts have always been one of my favorites, whether I'm baking them or eating them. The arrival of spring and summer means that I'll have plenty of different kinds of fruits to pick from, and plums are always on my shopping list.

    I made this delicious Plum Butter Cake the other day because I got so excited to see plums in my local grocery store. The recipe is quite easy, and the batter is a basic yellow cake batter, scented with cinnamon. The plums also give a lovely flavor to the cake, too.


    Last year a friend of one of my daughter's let us pick all the yellow plums that we could carry from her trees. We turned them into tarts, muffins, and topping for French toast and waffles. And we ate plums for days, it was heaven.

    I could have let the plums I bought ripen more, but I was too excited to bake the cake. Apricots, nectarines, and peaches can be substituted for the plums if you like.


    Recipe for Plum Butter Cake

    Ingredients:

    1 1/2 cups all-purpose flour
    1 teaspoon baking powder
    1/4 teaspoon salt
    1 cup unsalted butter, softened
    3/4 cup sugar, plus 1 tablespoon
    2 large eggs
    6 plums, pitted and thickly sliced
    1/4 teaspoon ground cinnamon

    Directions:

    Preheat oven to 350 degrees.
    Butter a 9-inch round or 8-inch square cake or deep dish pie plate. Line the bottom with parchment paper, and butter the paper.
    Stir the flour, baking powder, and salt together into a bowl. In another bowl, using an electric mixer, beat the butter and 3/4 cup sugar until pale and fluffy. Add the eggs and beat well. Add the dry ingredients and mix well, about 2 minutes.
    Pour the batter into the prepared pan and spread evenly. Poke the plum slices into the batter, placing them close together. In a small bowl, combine the cinnamon and 1 tablespoon sugar and sprinkle evenly over batter.
    Bake 45-50 minutes, until the cake is golden on top, and a toothpick inserted into the center comes out clean. Let cool in the pan on a wire rack 30 minutes before serving.

    Serves 6.


    Patricia
    Share:

    Monday, October 12, 2015

    Sour Cream Pumpkin Cake Recipe


    I'm so happy to see everything is in full pumpkin mode!! The grocery stores and farmer's markets are bursting with beautiful colored pumpkins, and it just makes my heart happy seeing them all.

    The same thing is true about cookbooks and magazines, they are filled with so many amazing and mouthwatering photos of delicious fall inspired foods.

    A few years ago, I stopped buying many of my favorite magazines because the prices of some of them was just getting beyond what I could afford. But I do buy some of the seasonal issues, especially the fall themed ones. And this is where this delicious Sour Cream Pumpkin Cake recipe comes from.

    It's in the Taste of Home Fall Baking magazine, and the magazine is really worth every penny, and one I'll be keeping for a long time to come.

    In this cake, there is a spiced streusel center that perfectly complements the cinnamon and pumpkin flavors. The sour cream in it makes it moist and delicious. This cake makes about 12 serving, depending on how you slice it. It was a big hit with my family, and the recipe is one I'll be making again for Halloween.


    Recipe for Sour Cream Pumpkin Cake

    Ingredients:

    2/3 cup packed brown sugar
    1 1/4 teaspoon ground cinnamon
    1/4 teaspoon ground allspice
    2 1/2 teaspoon cold butter

    Batter:

    1 cup butter, softened
    2 cups sugar
    4 large eggs
    1 cup sour cream
    1 cup canned pumpkin
    2 teaspoons vanilla extract
    3 cups all-purpose flour
    3 teaspoons ground cinnamon
    2 teaspoons baking soda
    1 teaspoon salt

    Glaze:

    1 1/2 cups confectioners' sugar
    2 tablespoons orange juice

    Directions:

    In a small bowl, combine the brown sugar, cinnamon, and allspice. Cut in butter until crumbly, set aside.

    In a large bowl, cream the butter and sugar until light and fluffy. Add the eggs, one at a time, beating well after each addition. Beat in the sour cream, pumpkin and vanilla. Combine the flour, cinnamon, baking soda and salt; gradually add to creamed mixture.

    Pour half of the batter into a greased 10 - inch fluted tube pan. Sprinkle with reserved crumb mixture; top with remaining batter. Bake at 350 degrees for 50-55 minutes or until a toothpick inserted in the center comes out clean.

    Cool for 10 minutes before removing from pan to a wire rack to cool completely. Combine glaze ingredients, drizzle over cooled cake.


    Patricia
    Share:

    Friday, June 5, 2015

    Starting Summer Fun With My Recipe For Dr Pepper® Cherry Chocolate Cake

    This shop has been compensated by Collective Bias, Inc. and it's advertiser. All opinions are mine alone. #ShareFunshine #CollectiveBias


    My grandchildren have officially started their summer vacations and that is something to celebrate around our house. No more school or schedules, or the many trips in the car everyday to get everyone where they need to be.

    That's pretty exciting and we are all looking forward to having a great summer this year. So, to kick off the start to our summer of fun, I baked a cake. I love baking, and I've been hearing so much about baking with soft drinks that I decided to use one of my favorites, Dr Pepper® Cherry.

    Well, I'm not exaggerating when I say this cake is absolutely, fabulously delicious!! My daughter and I both looked at each other in shock when we first tasted it. The chocolate is so intensified, with the hint of cherry in it, and I just love it. This recipe is a keeper, and I'll be making it again soon for a family member's birthday that is coming up.


    Summertime fun means buying our favorite treats and drinks to have on hand. While I was shopping at Walmart, I thought I would surprise everyone with some  SNICKERS® Ice Cream Bars, Dr Pepper® Cherry, M&M's® Cookie Ice Cream Sandwiches, and some Skittles®.

    If you'd like a chance to win a $100 Walmart e-gift card, be sure and enter the contest below. What a fun shopping trip that would be if you won!


    Share a Little Funshine Sweepstakes


    I enjoy making cakes for birthdays, holidays, and other occasions. I do think it's very much worth the effort of making a cake from scratch.

    My grandchildren were super excited that I was making a cake to celebrate the start of their summer vacation, and I know I'm making a memory with them. Even though they are young, I know they won't forget this amazing cake and the day I made it for them.


    This recipe is pretty easy to follow, but I do have a couple of things I want to emphasize. First, make sure you use a high quality cocoa powder because the chocolate flavor is so intense and you want it to be the best it can be.

    Only let the Dr Pepper Cherry, cocoa powder, butter and sugar get hot enough to melt the butter, you don't want it to get too hot or boil. It has to cool down so that the eggs can be added, and you don't want the eggs to cook in a hot mixture.

    And I did use canned frosting for this cake, which tasted great on it. With three little ones asking over and over when the cake was going to be done, I was happy to skip having to take the time to make frosting.

    Recipe for Dr Pepper Cherry Chocolate Cake

    Ingredients:

     2 cups Dr Pepper Cherry
    1 cup dark unsweetened cocoa powder
    1/2 cup (1 stick) unsalted butter, cut into 1-inch pieces
    1 1/4 cups granulated sugar
    1/2 cup firmly packed dark brown sugar
    2 cups all-purpose flour
    1 1/4 teaspoons baking soda
    1 teaspoon salt
    2 large eggs

    2 containers white frosting
    1 jar Maraschino cherries, rinsed and dried
    white sugar sprinkles (optional)

    Directions:

    Preheat the oven to 350 degrees. Generously grease or use cooking spray on two 9-inch round cake pans.
    In a medium saucepan, heat the Dr Pepper, cocoa powder, and butter over medium heat until the butter is melted. Add the sugars and whisk until dissolved. Remove from the heat and let cool. In a large bowl, whisk the flour, baking soda, and salt together.
    In a small bowl, whisk the eggs until just beaten, then whisk them into the cooled cocoa mixture until combined. Gently fold the flour mixture into the cocoa mixture. The batter will be slightly lumpy–do not overbeat, as it could cause the cake to be tough.
    Pour the batter evenly into the prepared cake pans. Bake for about 25 minutes, or until a toothpick inserted into the middle of the cake comes out clean. Let the cake cool in the pans about 30 minutes, then carefully run a thin spatula around the edges, then invert the cake onto a cake plate.
    Frost layers, then put the cherries on top of the finished cake. Sprinkle with white sugar sprinkles if desired.


    Of course when summer rolls around, I can't forget about our sweet dog, Chewy. He is very much a member of the family and deserves his own favorites, too.

    I like buying him Pedigree Dentastix® Original and Pedigree Dentastix® Beef Flavor, for a treat he loves that also helps with his oral care.

    Of course he can't have cake, but he can have a Dentastix® once a day to keep him happy and ready to jump in the car for some summer adventure.


    The kids loved the cake, and I scored big Nana points because of how delicious it turned out. My five year old grandson, Liam, will start all-day kindergarten in the fall, and it's sort of bittersweet. They aren't babies anymore, and it's just as hard to see time passing with them as it was with seeing my children growing up.

    So I want this summer to be filled with lots of spontaneous fun, family days, games, and favorite things to eat. And this cake got us off to a great start!!


    You can find Dr Pepper® Cherry, M&M's® Cookie Ice Cream Sandwiches, SNICKERS® Ice Cream Bars, Skittles®, Pedigree Dentastix®, and more, all at your local Walmart.

     Click here to receive instant savings on M&M's®, SNICKERS® Ice Cream Bars, Dr Pepper® Cherry, Skittles®, Pedigree Dentastix®! Download the Blippar app from your Apple or Android store to scan your package and receive exclusive content.

    I'd love to hear your favorite ideas for making summer FUN!

    Patricia
    Share:
    © Frugal Family Tree | All rights reserved.
    Blogger Template Designed by pipdig