Tuesday, October 23, 2018

Celebrating Fall Hot Apple Cider And Candy Apples Recipes #HarvestFun #ad #throwback

This shop has been compensated by Collective Bias, Inc. and its advertiser. All opinions are mine alone. #CollectiveBias #ad #HarvestFun

This is a #throwback from 2013 of one of our favorite #shops we have done with #CollectiveBias


My favorite season is fall, and here, the leaves are already beginning to turn gold.

 I'm very excited about the fall baking that I will be doing, and making favorite fall recipes and discovering new ones, too.

I love making fall treats for family and friends. I'm a grandmother to four little ones, and they love it when I make or bake something delicious just for them.

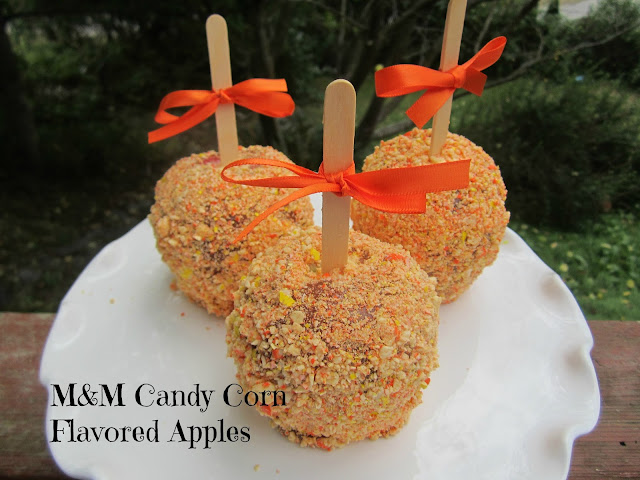
This weekend I could feel fall in the air, so I decided to make candy apples with Candy Corn flavored M&M's, and some delicious Mott's hot apple cider.


I went shopping at Walmart to buy the new fall packaged M&M's. They come in four flavors, including Peanut, Peanut Butter, Milk Chocolate, and the flavor I bought, Candy Corn.

I have made candy apples with M&M's before, and they are always a hit. They are great for fall activities where a treat is needed, and the perfect cute spin on giving an apple to your child's teacher.


Candy apples are easy to make, and it's fun to find different ingredients to make the outside coating taste delicious.

Candy corn is something we always have on hand in the fall, so I knew the Candy Corn flavored M&M's would be great to roll the caramel apples in. I just used my mini Magic Bullet to chop the M&M's, dipped the apples in the melted caramel, and then rolled them in the candy.

I really love giving candy apples as an unexpected little gift, or a thank you. I almost feel guilty for how little effort it took to make them, when the receiver is so happy to get them.

These were a huge hit this weekend with my kids and grandkids, so I'll try the other flavors of the fall M&M's too, especially the peanut kind.


I also made some hot apple cider this weekend, and we sat outside on the deck with it in the evening. This could be the last time we will be doing that, as the evenings are getting quite chilly.

I like making my apple cider with a bit of a citrus twist, by adding orange juice and lemon juice to the Mott's apple juice. This recipe can be doubled or tripled for a larger group, and not only do the adults love it, but the kids do to.

And your kitchen will smell deliciously like cinnamon and spices.


I've been buying the Mott's brand of apple juice for years, and gave it to my children, and now to my grandchildren.

It's the base of this great tasting apple cider with a twist. I like heating a cup of this cider in the microwave for myself in the afternoon or evening.

For me, nothing says fall like apple cider. It's so easy to make your own, and it tastes so much better than the bottled kind.


I love how cute these apples came out, and my daughter thought they would make sweet gifts for the teachers on Back To School Night.


Recipe for Candy Corn Flavored M&M Candy Apples

Ingredients:

5 apples, washed and dried
5 popsicle sticks
1 11 ounce package Kraft Caramel Bits
2 bags Candy Corn flavored M&M's

Directions:

Insert popsicle sticks about half way into apples.

In batches, chop up M&M's in a Magic Bullet or blender. Heat caramel bits according to package directions.

Dip apples in caramel and twist by stick to  remove excess. Roll in crushed M&M's, then place on waxed paper. Place in fridge to set and cool.


Recipe for Mott's Hot Apple Cider With a Citrus Twist

Ingredients:

1 quart Mott's Apple Juice
1/2 cup water
1/2 cup orange juice
1/4 cup sugar
1/4 cup lemon juice
1 cinnamon stick
1 tablespoon brown sugar
2 table spoons cloves or cider spice mix
Additional cinnamon sticks for serving with cider

Directions:

In a large saucepan, combine the first 8 ingredients. Bring to a boil. Reduce heat: simmer uncovered for 15 minutes.
Strain, discarding cinnamon stick and cloves. Serve warm, garnish with additional cinnamon sticks.

Makes 5 cups.

For more great ideas visit the Fall Baking and Entertaining Pinterest Board.
Share:

Sunday, December 18, 2016

Flourless Chocolate Espresso Tart


Do you adore chocolate like I do? Maybe that's a silly question because it seems like everyone is in love with chocolate. Whether it's cake, or brownies, or candy, it seems like a real favorite with all my friends and family. Especially this time of year.

We've had quite a few people over for dinner lately, which is fun for me, because I love cooking and baking. And planning menus actually gets me excited! I'm no Martha Stewart for sure, but I do enjoy entertaining and everything it entails.

I needed a dessert last week for after dinner, and I really wanted something chocolaty. I had had this recipe for Flourless Chocolate Espresso Tart that a friend had written down for me, but I hadn't tried it yet. It's surprisingly simple and only requires six ingredients.

Well let me tell you, it turned out delicious. So rich and chocolaty, with the flavor of espresso coming through perfectly. Yum, is all I can say. Do use top quality ingredients if you can, because it really does make a difference.

If you want to impress guests or just indulge in your love of chocolate, I highly recommend you make this tart. I'm going to make it again on Christmas Eve to go with a couple of other desserts for when we have family and friends coming over. Oh, and if you like, you can add a little whipped cream on top to make it extra special.

Recipe for Flourless Chocolate Espresso Tart

Ingredients:

4 ounces fine-quality bittersweet chocolate
3/4 cup sugar
1/2 cup unsalted butter, melted and cooled to room temperature
3 large eggs, lightly beaten
1 cup unsweetened cocoa powder, plus more for dusting
1 1/2 tablespoon instant espresso
whipped cream if desired

Directions:

Preheat the oven to 375 degrees. Butter an 8-inch round cake pan.

In the top pan of a double broiler, melt the chocolate over (but not touching) simmering water. Scrape the melted chocolate into a large bowl, add the sugar and melted butter, and stir to mix well. Add the eggs and mix well. Sift in the cocoa powder and espresso and stir until the batter is smooth and well blended.
Pour into the prepared pan and bake until the top begins to form a fudge-like crust, 20-25 minutes.

Remove the cake from the oven and let cool in the pan for 10 minutes, then invert onto a serving plate. Dust tart with cocoa powder, and top with whipped cream if desired. Cut into wedges and serve.

Makes 6 servings.

-Post by Patricia


Share:

Monday, December 12, 2016

Happy Birthday Chocolate Cupcakes


This weekend we celebrated my granddaughter Ashley's fifth birthday. We had a wonderful time that was shared by family and friends, and she got way too many presents. But isn't that half the fun of a birthday party when you're a child, to open birthday gifts from people who love you.

Days like this make me count my blessings. There are so many things I'm striving and hoping for, but when I realize how blessed I am by such a loving family, I'm truly humbled. I hope Ashley grows up to feel that she is blessed too. It's not a small thing in this big, hard world, to know that there are people out there that love you and wish the best for you always.

Okay, so on to these fabulous and delicious cupcakes that the birthday girl herself helped me bake and decorate. She has been baking with me for a couple of years now, and is now more interested in the actual baking instead of just licking the mixing beaters.

This is a Martha Stewart recipe for the cupcakes and the frosting. It's actually pretty simple to make the cupcakes, and the frosting is ready in no time. I doubled the recipe to make 24 cupcakes, and tinted the frosting pink. So, so good!!

Recipe for Martha Stewart's Chocolate Cupcakes

Ingredients:

3/4 cup unsweetened cocoa powder
3/4 cup all purpose flour
1/2 teaspoon baking powder
1/4 teaspoon salt
3/4 cup (1 1/2 sticks) unsalted butter at room temperature
1 cup sugar
3 large eggs
1 teaspoon vanilla
1/2 cup sour cream

Directions:

Preheat oven to 350 degrees. Line 12-cup standard muffin tin with paper liners.         

Into a medium bowl, sift together cocoa, flour, baking powder, and salt; set aside. In a mixing bowl, cream butter and sugar until light and fluffy. Add eggs, one at a time, beating well after each, then beat in vanilla. With mixer on low speed, add flour mixture in two batches, alternating with sour cream and beginning and ending with flour.
   
Pour batter into cups, filling each 3/4 full. Bake until a toothpick inserted in centers comes out clean, 20 to 25 minutes.
     
Cool in pan 5 minutes; transfer to a wire rack to cool completely.

Recipe for Easy White Icing

Ingredients:

1 1/2 sticks unsalted butter, softened
1 pound (3 2/3 cups) confectioners' sugar
1 to 2 tablespoons milk (optional)

Directions:

In a mixing bowl, cream butter until smooth.
  
Gradually add confectioners' sugar; beat until smooth. If too thick to spread, beat in 1 to 2 tablespoons milk.

Frost cupcakes and decorate with sprinkles if desired.

Makes 12 cupcakes.


-Post by Patricia 
Share:

Thursday, June 30, 2016

Chocolate Pound Cake Recipe From Homemade Decadence Cookbook


Pound cake is one of those good old-fashioned desserts that everyone seems to love. I always think of homey comfort when I think of pound cake, whether it's a slice with a cup of tea, or the basis of strawberry shortcake.

As much as I love regular pound cake, when I found this recipe for Chocolate Pound Cake from the cookbook Homemade Decadence from Joy The Baker, I knew I had to make it.

It's filled with chocolate chips, and has a deep rich chocolaty flavor, and made with coffee in it. The addition of coffee to a chocolate cake recipe just really brings out the chocolate flavor. Joy made her recipe with a chocolate glaze on top, but I wanted to top mine with whipped cream and raspberries, so I left it off.

Every time I bake with buttermilk I'm always reminded of how much goodness it brings to baked goods. It just really improves the flavor and richness of almost every recipe.


A sweet neighbor of ours came over with lots of delicious raspberries to share, so I've been using them up in recipes and smoothies. That's definitely one of the things I love about summer, all the luscious berries available.

I'm adding this recipe to my favorites list and I can't wait to make it with the glaze on top of it. I added the recipe for the glaze too, yum!


Recipe for Chocolate Pound Cake from Homemade Decadence

Ingredients:

Cake:

1/3 cup unsweetened Dutch-processed cocoa powder
1/3 cup hot coffee
1 3/4 cup cake flour
1 teaspoon baking powder
1/2 teaspoon salt
1 cup (2 sticks) unsalted butter, at room temperature
1 cup granulated sugar
2 large eggs
2 teaspoons pure vanilla extract
1/4 cup buttermilk
3/4 cup dark chocolate chips

Glaze:

1 1/2 cups confectioners' sugar, sifted
3 tablespoons unsweetened Dutch-processed cocoa powder
Pinch of salt
3 to 4 tablespoons milk or water
2 teaspoons pure vanilla extract

Directions:

1. Put a rack in the center of the oven and preheat the oven to 350 degrees. Grease and flour a 9 x 5 inch loaf pan and set aside.


2. For the cake, in a small bowl, whisk together the cocoa powder and hot coffee.


3. In a medium bowl, whisk together the flour, baking powder, and salt.


4. In the bowl of an electric mixer fitted with the paddle attachment, beat the butter and sugar on medium speed until light and fluffy, about 3 minutes. Reduce the speed to low and add the eggs, one at a time, beating for one minute after each addition. Beat in the vanilla. With the mixer on low speed, gradually add the flour mixture and beat until just combined. Add the cocoa-coffee mixture and beat well. Beat in the buttermilk. Fold in the chocolate chips. Spoon the batter into the prepared pan and smooth the top.


5. Bake until a wooden pick inserted in the center of the cake comes out clean, with just a few crumbs, 50 to 60 minutes. Let cool for 20 minutes before inverting the cake onto a wire rack to cool completely.


6. Meanwhile, for the glaze, in a small bowl, whisk together the confectioners' sugar, cocoa powder, salt, milk, and vanilla.


7. Once the cake has completely cooled, drizzle the chocolate glaze on top. Let set for 30 minutes before serving.


8. The cake will keep, well-wrapped and at room temperature, for up to 4 days.


Makes one 9 x 5-inch loaf.


Patricia


Share:

Wednesday, May 11, 2016

Little Flourless Chocolate Cakes Recipe


Chocolate is my weakness, and these little cakes had me going slightly crazy, that's how good they are. If you love over the top, rich and chocolaty desserts, you'll love this recipe.

I've always wondered how a flourless chocolate cake would taste because I've never made a cake without flour before. I guess I just thought it was an odd concept, no flour in a cake?

Well, this cake needs no flour at all because it's filled with moist, and chocolaty goodness. I made it in six ramekins, though the recipe says to use ten smaller sized ones. You can do either, but I liked the idea of a bigger serving.


The recipe comes from the cookbook Sheet Pan Suppers by local Seattle author Molly Gilbert. Of course the supper recipes are amazing but when I was looking through the book, my eye caught the Flourless Chocolate Cakes.

You can either sprinkle them with powdered sugar or do what I did, which is to add a scoop of vanilla ice cream. Either way, they are just so good.


Recipe for Flourless Chocolate Cakes

Ingredients:

1/2 pound ( 2 sticks) unsalted butter
8 ounces semisweet chocolate, chopped
1 teaspoon pure vanilla extract
1 1/4 cups granulated sugar
1 cup unsweetened Dutch-process cocoa powder
1 teaspoon espresso powder
1/2 teaspoon kosher salt
6 large eggs

Confections' sugar, or vanilla ice (optional)

Directions:

Preheat oven to 350 degrees, with a rack in the center position. Place ramekins (6 larger or 10 smaller) on a sheet pan.

Melt the butter in a small saucepan over medium heat. Remove from the heat and stir in the semisweet chocolate. Stir until the chocolate is smooth and fully melted. Add the vanilla and stir to combine.

Whisk together the granulated sugar, cocoa powder, espresso powder, and salt in a large bowl. Add the eggs and whisk until smooth. Add the melted chocolate and whisk until well incorporated.

Divide the batter among the ramekins, filling each about three-quarters full. Bake until a skewer inserted into the center comes out with just a few moist crumbs, 30-40 minutes.

Let the cakes cool slightly- they will fall a bit in the center-  before serving warm, dusted with confections' sugar or a scoop of ice cream.

The cakes will keep, wrapped in plastic, in the fridge for 3-4 days. Eat them cold or rewarm them in a 350 degree oven for about 15 minutes.

Patricia
Share:

Wednesday, April 27, 2016

Delicious Chocolate Cake


The more I bake, the easier it gets when I have a pantry filled with all the ingredients that I need. There's nothing more frustrating than to get inspired about baking something yummy and then discover you don't have all the things you need.

So I've been keeping an eye on what I have in the pantry and jotting down something when it starts getting low as a reminder to myself to pick up whatever it is the next time I'm at the grocery store. And if you knew me, you'd be highly impressed because I'm sometimes the type of person who is out of butter just when it's time to put some on your toast.

Yesterday I decided it was a great day for making chocolate cake, what day isn't great for chocolate cake, right?

I'm discovering that whenever I use sour cream as an ingredient in a cake, it's usually extra moist. This recipe uses sour cream, and I'm convinced that's one of the reasons why it tastes so good. And it's a Martha Stewart recipe and I can pretty much count on her recipes turning out well.


This cake is pretty easy to make, and has a rich chocolaty flavor that you'll love. You can make it in a Bundt pan or a tube pan. I actually have a tube pan that the cake just lifts out and that's what I used for this cake.

It serves about eight good sized portions. We ate it for dessert and had some left over and it was equally moist and yummy the next day.


Recipe for Delicious Chocolate Cake

Ingredients:

  • 8 ounces (2 sticks) unsalted butter, plus more for pan
  • 2 1/4 cups all-purpose flour
  • 3/4 cup unsweetened cocoa powder
  • 1 teaspoon baking soda
  • 1 teaspoon salt
  • 1/2 cup milk
  • 1/2 cup sour cream (4 ounces)
  • 1 1/2 cups sugar
  • 4 large eggs
  •  
    For the glaze:
     
    3 ounces bittersweet chocolate, chopped
  • 1/2 cup heavy cream
  • 2 tablespoons unsalted butter

  • Directions:

    Preheat oven to 350 degrees. Spray a Bundt or tube with non-stick baking spray.
    In a large bowl, whisk together flour, cocoa, baking soda, and salt. Mix together milk and sour cream in a measuring cup.
    With an electric mixer on medium-high speed, beat butter and sugar until pale and fluffy, 3 to 5 minutes. Add eggs, 1 at a time, beating well after each addition; add vanilla. Reduce speed to low; add flour mixture in 2 batches, alternating with the milk mixture and beginning and ending with the flour; beat until just combined. until just combined. Transfer batter to prepared pan; smooth top with an offset spatula. Bake until a cake tester comes out clean, about 55 minutes. Transfer pan to a wire rack to cool completely.

    Make the glaze: Place chocolate in a heatproof bowl. Bring cream to a simmer in a small saucepan; pour over chocolate. Let stand 2 minutes. Add butter, and mix until smooth. Let stand, stirring occasionally, until slightly thickened. Pour glaze over cake.


    Patricia
    Share:

    Monday, March 21, 2016

    Chewy S'mores Bars Recipe


    I don't know anyone who doesn't love the gooey, yummy chocolaty and marshmallow taste of s'mores. They have always been a delicious treat that we make when my family and I go camping every year at Lake Cushman in Washington State.

    I'm not really a big camper, I love the comforts of home for sure, but it's a lot of fun to get together with my kids and grandkids for a few days at the lake. I have a lot of great memories from these times, and I hope it's times that my family will always remember with warmth and happiness.

    As much as I love s'mores, I sure don't want to wait just once a year to eat them. So when I found this recipe, I was eager to give it a try. I'm so glad I did because they are so delicious!!

    Loaded with chocolate chips and marshmallows, they are all the yumminess of regular s'mores but you can have them whenever you want, and not just around the campfire. My family loved them, and this is a recipe that's a keeper for sure.


    Recipes for Chewy S'mores Bars

    Ingredients:

    3/4 cup butter, softened
    1 1/2 cups packed brown sugar
    2 eggs
    2 teaspoons vanilla extract
    1 cup all-purpose flour
    1 1/2 cups quick-cooking rolled oats
    1 cup finally crushed graham crackers
    2 1/2 cups mini marshmallows
    1 cup semisweet chocolate chips

    Directions:

    Preheat oven to 350 degrees. Line a 13 x 9-inch baking pan with foil, extending foil over edges of pan. Lightly grease foil with baking spray.
    In a large bowl, beat butter with a mixer on medium for 30 seconds. Beat in brown sugar until combined, scraping bowl occasionally. Beat in eggs and vanilla. Beat in flour. Stir in oats and graham cracker crumbs.
    Reserve 1 cup of the oat mixture. Spread the remaining oat mixture into prepared pan. Bake 15 minutes. Take out of oven and sprinkle warm crust with marshmallows. Top with chocolate chips. Dot with the remaining oat mixture. Bake 20 minutes more or until top is lightly browned. Cool in pan on a wire rack. Use foil to lift uncut bars out of pan. But into bars.

    Makes 12 large bars.


    Enjoy!!

    Patricia
    Share:

    Monday, March 14, 2016

    Chocolate Sprinkled Donuts Recipe For Spring


    Spring is finally coming and even though it's still a few days away, I'm very excited. It's been a very cold and rainy winter in the Seattle area this year, and I'm done with it. We have had more power outages this year than I can ever recall, and it can be so frustrating to try and get things done when you have no electricity.


    So the last time we had a power outage, as soon as it came back on, my granddaughter Ashley and I decided we needed to make donuts to celebrate. She is my little baking buddy and she would have us bake everyday if I let her. But I was ready to celebrate the return of our electricity and baked donuts are something that can be made quickly and with little fuss.

    I always try to have different varieties of sprinkles on hand because they can turn something plain into something fun and festive.

    Since I love being frugal, I'm always on the hunt for a good deal and I found a good sized container of these sprinkles at Target for only a dollar. Now that's a bargain!


    A lot of baked donut recipes call for buttermilk, but since I don't keep it on hand, I always have to plan ahead and buy some before I can make donuts. I was happy to find a recipe for these cake donuts that doesn't require buttermilk, so it's perfect for whipping a batch up whenever you feel like it.

    These are rich and chocolaty, and super simple to put together. Since my granddaughter was helping to make these, I was glad the recipe was so easy.

    If you love donuts, I recommend buying a donut pan. I have the regular size pan, and recently bought the mini size, which makes cute little donuts that my family loves.


    Recipe for Chocolate Sprinkled Donuts

    Ingredients:

    1 1/2 cups all-purpose flour
    1/4 cup cocoa powder
    1/2 cup sugar
    2 teaspoons baking powder
    1/4 teaspoon salt
    1 large egg
    1/2 cup milk
    1/4 cup butter, melted and cooled

    For glaze:

    2 cups confectioners sugar
    about 6 tablespoons milk
    1/4 teaspoon vanilla extract
    sprinkles of choice

    Directions:

    Preheat oven to 350 degrees.

    In a bowl, whisk together flour, cocoa powder, sugar, baking powder, and salt. In another bowl, beat egg to blend with milk, melted butter, and vanilla.
    Add flour mixture and stir just until all ingredients are combined. Spoon batter 2/3 full into a well greased donut pan.
    Bake 8-10 minutes. Let donuts cool on a wire rack before glazing.

    To make the glaze, whisk together the confectioners sugar, milk and vanilla. Dip cooled donut halfway into the glaze, place on wire rack, then decorate with sprinkles.

    Makes 12 donuts.

    Patricia
    Share:

    Friday, May 1, 2015

    Double Chocolate Walnut Donuts Recipe


    The other day when I was at the grocery store, at my favorite coffee shop, and out running errands, I kept seeing donuts. Donuts seemed to be everywhere, but I resisted buying any, I didn't need donuts, right?

    When I got home, I still wanted donuts, so I pulled out my donut pan and decided to make these delicious Double Chocolate Walnut Donuts, which I think are just as good as any bakery sells.

    One of the great things I love about making donuts is that, except for the buttermilk, I always have the ingredients on hand. I used to think they would be hard to make but they aren't, in fact it's very easy.

    These donuts are chocolate, with a chocolate glaze, and can be made with nuts or sprinkles, or just left plain. Either way, they taste great.


    Recipe for Double Chocolate Walnut Donuts

    Ingredients:

     1 cup all-purpose flour
    1/4 cup unsweetened cocoa powder
    1/2 teaspoon baking soda
    1/4 teaspoon salt
    1/2 cup brown sugar, packed
    1/2 cup buttermilk
    1 large egg
    4 tablespoons unsalted butter, melted
    1 teaspoon pure vanilla extract

    For the Chocolate Glaze:

     1 1/4 cup powdered sugar
    3 tablespoons unsweetened cocoa powder
    big pinch salt
    4 tablespoons whole milk
    2 teaspoons pure vanilla extract

    1 cup walnuts, chopped small

    Directions:

     Preheat oven to 350 degrees. Spray a donut pan with a light coating of nonstick baking spray.
    In a medium bowl, whisk together flour, cocoa powder, baking soda, salt, and brown sugar.
    In a small bowl, whisk together buttermilk, egg, melted butter, and vanilla extract until thoroughly combined.
    Pour the wet ingredients into the dry ingredients and fold together until all of the ingredients are well combined. Use a small spoon to portion batter into the prepared doughnut baking pan.  Each doughnut mold should be about two-thirds full.  Bake doughnuts for 10-12 minutes or until a toothpick inserted into one of the doughnuts comes out clean.  Remove from the oven.  Allow to rest for five minutes before inverting doughnuts onto a wire rack to cool completely.  Allow doughnuts to cool completely before glazing.
    Repeat the baking process until all of the batter is turned into doughnuts.

     To make the glaze, in a medium bowl whisk together powdered sugar, cocoa powder, and salt.  Add 2 tablespoons of milk and all of the vanilla extract.  Whisk to combine.  Mixture may be thick.  Add milk, a tablespoon at a time, until the glaze is thick but still pourable.
    Dip each donut about halfway down into the chocolate glaze. Place on a wire rack, and then sprinkle on walnuts.
    Let the donuts sit for a few minutes to settle.

    Makes 10 donuts.
    Patricia
    Share:

    Tuesday, August 26, 2014

    Football Fun with Chocolate MARS Candy Bar Ice Cream Brownie Cake

    This shop has been compensated by Collective Bias, Inc. and its advertiser. All opinions are mine alone.


    Football and good food seem to go hand in hand. I usually buy savory dips or spicy wings for football games and make the dessert myself. I enjoy making sweet treats to share with my loved ones. For this football gathering I made MARS Chocolate Candy Bar Football Ice Cream Brownie Cake.

    The part of football we love the most is being fans. We like rooting for our team, wearing the team colors and being a part of the excitement with fellow fans. Another aspect of  football fun can be team rivalry and we have that in our family. My husband and I are all about the red and gold while our cousins are true black and sliver fans! It makes it a little more fun to have these opposing local teams be our different favorites. We do all agree on a love of chocolate candy bars!! #Chocolate4TheWin #CollectiveBias


    Recipe for MARS Candy Bar Football Ice Cream Brownie Cake

    1 bag of 105 count variety bag of MARS Candy bars
    1 box of brownie mix
    1.5 quart of vanilla ice cream

    First make brownies according to the instructions on the boxed mix you purchased. After brownies bake allow them to cool before making ice cream cake. In a rectangle or square pan layer the ice cream, brownies and MARS Chocolate candy bars, freezing the ice cream between the layers for 10 minutes to set. Top layer should end with vanilla ice cream. For the fun size candy bars I smashed them first to make them easier to bite in the cake. I included Milky Way, 3 Musketeer and SNICKERS®  bars in my cake, you can select the ones you enjoy from the 105-count variety bag.

    After letting the whole cake freeze use a knife to cut out the shape of a football, removing the outside ice cream brownie cake from the sides first making it easier to take the football shape out of the pan. Place the football shaped cake on a plate. Use the full size SNICKERS® to cut into shape of the football threads and add to top of the cake, freeze for one more 15 minute interval.


    My husband, son and I loved the MARS Candy Bar Football Ice Cream Brownie Cake. I will be making this again next time we host a football party for our family. You can find the MARS 105-count variety bag and 48 count SNICKERS® at your local Sam's Club. We found our candy aisle near a sampling machine that dispensed candies and it happen to be a sampling day including candy. My son and I were having some serious candy fun!


    My recipe can be interchangeable with the flavors of the main ingredients. Using blonde brownies and chocolate ice cream or many other combinations would be delicious with the MARS Candy.


    I made a few MARS candy bar necklaces to wear while watching the game for easy snacking.

    Laura

    Share:

    Wednesday, May 21, 2014

    Chocolate Brownie Cupcakes Made With TWIX Bites Candy


    One of my very favorite candies, TWIX, now comes in packages of bite-size pieces. And if you are a candy lover like me, this is great news!!

    Of course I love eating my TWIX Bites right out of the bag, but I've also been having some fun with using candy in my baking recipes lately.

    Brownies are a big favorite around my house, so I decided to pair my best brownie recipe with new TWIX Bites for a yummy treat that my whole family would love.


    I adore chocolate and so do my grandchildren. They quickly figured out that the TWIX Bites are the perfect size for those little fingers to pop right in their mouths!!

    I was grocery shopping at Walmart when I found the TWIX Bites, and I saw they come in Milk Way, Snickers, and 3 Musketeers varieties, as well. I bought a few bags, thinking these would be the perfect treat for our family movie nights.


    When I made my chocolate brownie cupcakes, the first thing I did was to chop up the TWIX Bites. Since they would be going inside the cupcakes and on top, I used the whole package to make sure they tasted really fabulous.


    I made my favorite, super-easy brownie recipe, and filled the cupcake liners about a third full. Then I dropped in three pieces of the cut Twix Bites, and then added more brownie mix.

    I filled the liners about 3/4 full because I like a big cupcake, and I'd rather have fewer and have them be big and fabulous, than more smaller ones.


    My cream cheese frosting recipe is from Martha Stewart, and it really is delicious. I use this frosting for so many baked goods, including cakes, carrot cake, and cookies.

    The brownie cupcakes came out of the oven and sank a tiny bit, but it turns out this just made them even more chocolaty. And they smelled so good!!


    Recipe for Chocolate Brownie Cupcakes With Twix Bites

    Makes 16-18

    Ingredients:                                              
                                                            
    1 cup butter 
    1 cup cocoa  powder
    1 1/2 cups sugar
    3 eggs
    2 teaspoons vanilla extract
    1/2 teaspoon salt
    1 1/2 cups all-purpose flour
                                                                                                                                                 

    8 ounces (1 bar) cream cheese, room temperature
    1 cup confectioners' sugar
    1/2 teaspoon vanilla extract
    1 Bag of TWIX bites, chopped

    Directions:

    Preheat oven to 350 degrees. Line a cupcake pan with paper liners. Melt butter in a small sauce pan, then pour into a medium bowl. Add cocoa powder and stir until well combined.
    Add eggs and stir into mixture. Stir in vanilla, flour, and salt. Do not over mix. Fill liner with batter 1/3 full. Drop in chopped TWIX pieces, and fill about 3/4 full. Bake 20-22 minutes.

    Frosting:
    With an electric mixer on medium-high speed, beat cream cheese, confectioners' sugar, and vanilla until fluffy. Spread frosting on top of cupcakes when they are cooled, and top with chopped TWIX pieces.


    The cupcakes ended up tasting super good, so rich and chocolaty, and with TWIX as a delicious center. My family and I ate them for dessert that night, and I snuck one for breakfast the next morning!

    This really is an easy recipe, and well worth the effort of making brownies from scratch. They can also be made with the other varieties of candy, and I'm thinking I'll make them with Snickers Bites for my grandson's end of the year barbeque. I'm sure they would be a hit with the kids and the parents, too.
    #CollectiveBias


    You can find all four varieties, including TWIX Bites, at your local Walmart.

    There is also a great coupon at Social Twist that lets you save $1.00 off when you buy two 2.83 oz. or larger bags, or $3.00 off when you buy two 6 oz. or larger bags.


    What a great reason to #EatMoreBites, right?


    Patricia
    Share:
    © Frugal Family Tree | All rights reserved.
    Blogger Template Designed by pipdig